Best Practices for PyTorch Training
Naming Convention
| Type | Convention | Example |
|---|---|---|
Packages & Modules | lower_with_under | from prefetch_generator import BackgroundGenerator |
Classes | CapWords | class DataLoader |
Constants | CAPS_WITH_UNDER | BATCH_SIZE=16 |
Instances | lower_with_under | dataset = Dataset |
Methods & Functions | lower_with_under() | def visualize_tensor() |
Variables | lower_with_under | background_color=’Blue’ |
👍 해당 github에서 말하는 내용을 내가 격어왔다는 점은 꽤나 흥미로웠다
(특히 jupyter notebook으로 다양하게 실험하고, python script로 넘어와서 train deploy 수준의 reproducibility를 높였다는 점)
Commonly used libraries:
| Name | Description | Used for |
|---|---|---|
| torch | Base Framework for working with neural networks | creating tensors, networks and training them using backprop |
| torchvision | PyTorch computer vision modules | image data preprocessing, augmentation, postprocessing |
| Pillow (PIL) | Python Imaging Library | Loading images and storing them |
| Numpy | Package for scientific computing with Python | Data preprocessing & postprocessing |
| prefetch_generator | Library for background processing | Loading next batch in background during computation |
| tqdm | Progress bar | Progress during training of each epoch |
| torchinfo | Print Keras-like model summary for PyTorch | Displays network, it’s parameters and sizes at each layer |
| torch.utils.tensorboard | Tensorboard within PyTorch | Logging experiments and showing them in tensorboard |
🧐 prefetch_generator 빼고는 다 씀 (생산성 및 학습 안정성을 위해서), prefetch_generator를 사용해보아야 겠다.
File organization
- layer, losses, ops 와 같이 분리해 두고
- Main model은 model_name.py로 파일을 설정한다.
Finally trainiing and test code imports only the final model_name.py module
Building NN
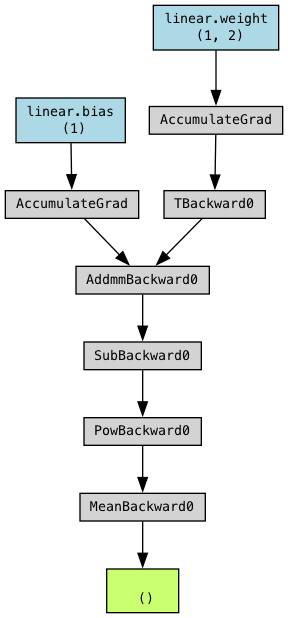
Loss function도 nn.Module로 해서 computation graph에 자연스럽게 녹아들도록 설계한다.
torchviz를 활용한 computation graph visualization
Vgg perceptual loss 같은 경우에, pretrained model의 .feature 을 불러와서 각 silce nn.Sequential module에 .add_module을 이용해서 for문으로 모델을 분리한다. 또한 requires_grad=False로 model을 freeze한다.
Train Code Structure
Import
seed
(Main)
ㄴ argparse
ㄴ dataset transform
ㄴ dataset / dataloader
ㄴ instantiate network
ㄴ create loss
ㄴ device setting (cuda, mps)
ㄴ create optimizer
ㄴ load checkpoint if needed
ㄴ create tensorboard writer
(Main Loop)
ㄴ Set model to train mode
ㄴ Use prefetch_generator and tqdm to iterate through data
ㄴ Forward / backward (zero_grad, backward, step)
ㄴ Update writer
ㄴ Compute computation time and compute_efficiency
ㄴ Test code (optional)
ㄴ Save checkpoint (if needed)
Tip: It is very good practice to track both preparation time and computation time using tqdm to detect any issues in your dataloader.
적용해 볼 점 :
- data_prefetcher
- data loading time과 computation time을 분석해서 computation efficiency check할 것
아래는 요청하신 내용을 가독성 있게 kramdown 형식으로 재구성한 버전입니다.
text와 text를 적극적으로 활용했고, 원래의 의미와 내용은 그대로 유지했습니다.
Do’s and Don’t’s
 Don’ts
-
Avoid using
numpyin theforwardmethod ofnn.Module
Numpy runs on CPU only. PyTorch supports most numpy functions, so use torch equivalents for GPU compatibility! -
Don’t log results in every step
Typically, models train for thousands of steps. Logging loss and results everynth step is enough to reduce overhead.
Especially, saving intermediate results as images can be costly during training.
 Do’s
Do’s
-
Use command-line arguments
You can track training arguments by using f.write(opt.str()) to save them. -
Use
.detach()to free tensors from the computation graph
If you don’t need gradients, detach tensors to save memory and computation. -
Use
.item()when printing scalar tensors
This converts a single-value tensor to a standard Python number for easier printing. -
Use the
__call__method instead offorwardon ann.Module
Calling the module directly (e.g.,model(input)) is preferred over explicitly callingmodel.forward(input).
soso Tips
We can use virtual batch (accumulating grad and updating on virtual batch size)
References :
PEP 8 – Style Guide for Python Code
A PyTorch Tools, best practices & Styleguide
Pytorch .detach()
Google pyguide